Controller and Tablet Usage Guide
Controller Configuration
- Product Model: GameSir G8+ Controller
- Companion Device: Redmi 8.8-inch Xiaomi Android Tablet (for HMI interface display and control)
Disclaimer
This usage guide is only for users to operate the robot with the controller and does not constitute any legal or technical commitment. When using the GameSir G8+ controller and companion Redmi 8.8-inch Android tablet for robot operation, users should carefully read the accompanying "Spirit-AI Moz1 User Manual". Spirit-AI assumes no direct or indirect responsibility for equipment damage, personal injury, or data loss caused by misoperation, equipment failure, or third-party reasons.
This controller and tablet system is only applicable to local control and monitoring scenarios of the Moz 1 robot platform. Use for unauthorized, unofficial industrial or entertainment purposes is prohibited.
It is recommended to operate under the guidance of professional technical personnel to ensure safe and compliant operation.
Safety Instructions
- Operating the robot without supervision is prohibited, especially in auto-return-to-zero, high-speed motion, or power on/off modes.
- Before operation, confirm that the robot is in a safe state, and the work area is free of personnel, obstacles, or flammable items.
- Using this controller in high voltage, humid, high temperature, or flammable environments is strictly prohibited.
- The "Power On/Off" combination keys on the controller (such as RT+LT+A) will trigger all mechanical units to power on. When operating, confirm that the robot has left the danger zone and the work area is clear of personnel.
- If you notice abnormal heating of the controller, button failure, or screen unresponsiveness, stop using immediately and contact customer service.
- This controller does not support remote control or network operation. All controls are local real-time feedback, and the operator must pay attention to the status throughout.
- When using the controller, the wireless emergency stop should be placed within easy reach of the operator, and safety should be monitored at all times.
- The tablet device (Redmi 8.8-inch) is used to display robot status, path, parameters, and other information, and also supports direct touch screen control, which can work independently without the controller.
- When using the tablet device for independent control, please completely confirm that the controller is powered off.
Product Overview
The GameSir G8+ controller used in conjunction with the Redmi 8.8-inch Xiaomi Android tablet, combined with the Spirit-AI robot operation software MovaXHelper HMI, is a high-performance operation controller designed specifically for the Moz 1 robot, supporting local control and HMI visual monitoring, enabling human-machine interaction, status monitoring, and real-time feedback.
- The controller supports user control mode and external control mode (VR/remote)
- The tablet is used to display robot status, path trajectory, parameter settings, alarm information, etc., and can also fully implement all controller functions.
- The controller has multi-degree-of-freedom buttons, supporting fine control of acceleration, speed, direction, joint motion, etc.
- Equipped with one-key return-to-zero, emergency stop, power on/off control, and other functions to improve operation safety and efficiency.
Introduction
This system consists of G8+ controller + Redmi 8.8-inch Android tablet, connected via Bluetooth, enabling linkage between controller control and tablet display. The controller is responsible for executing motion commands, and the tablet is used to display robot status, position, operation logs, and other information in real-time, facilitating user monitoring and debugging. When the tablet is used independently, full-function robot operation can be achieved through touch buttons.
Mode Description:
| Mode | Description |
|---|---|
| Task Mode: User Control (Default) | Directly control robot motion through the controller, with the tablet displaying current status, speed, position, and other parameters in real-time. |
| Task Mode: External Control (VR/Remote) | Requires use with VR headset or remote device, the controller serves as an input device, transmitting commands through the system, suitable for remote inspection, teaching, and other scenarios. |
Connecting and Using the Tablet
Please carefully read the tablet and controller companion usage instructions before powering on. When shipped with the Spirit-AI Moz 1 robot, the tablet has already been paired with the controller and tested, and can be used directly. Please keep the tablet Bluetooth on during use.
Quick Start:
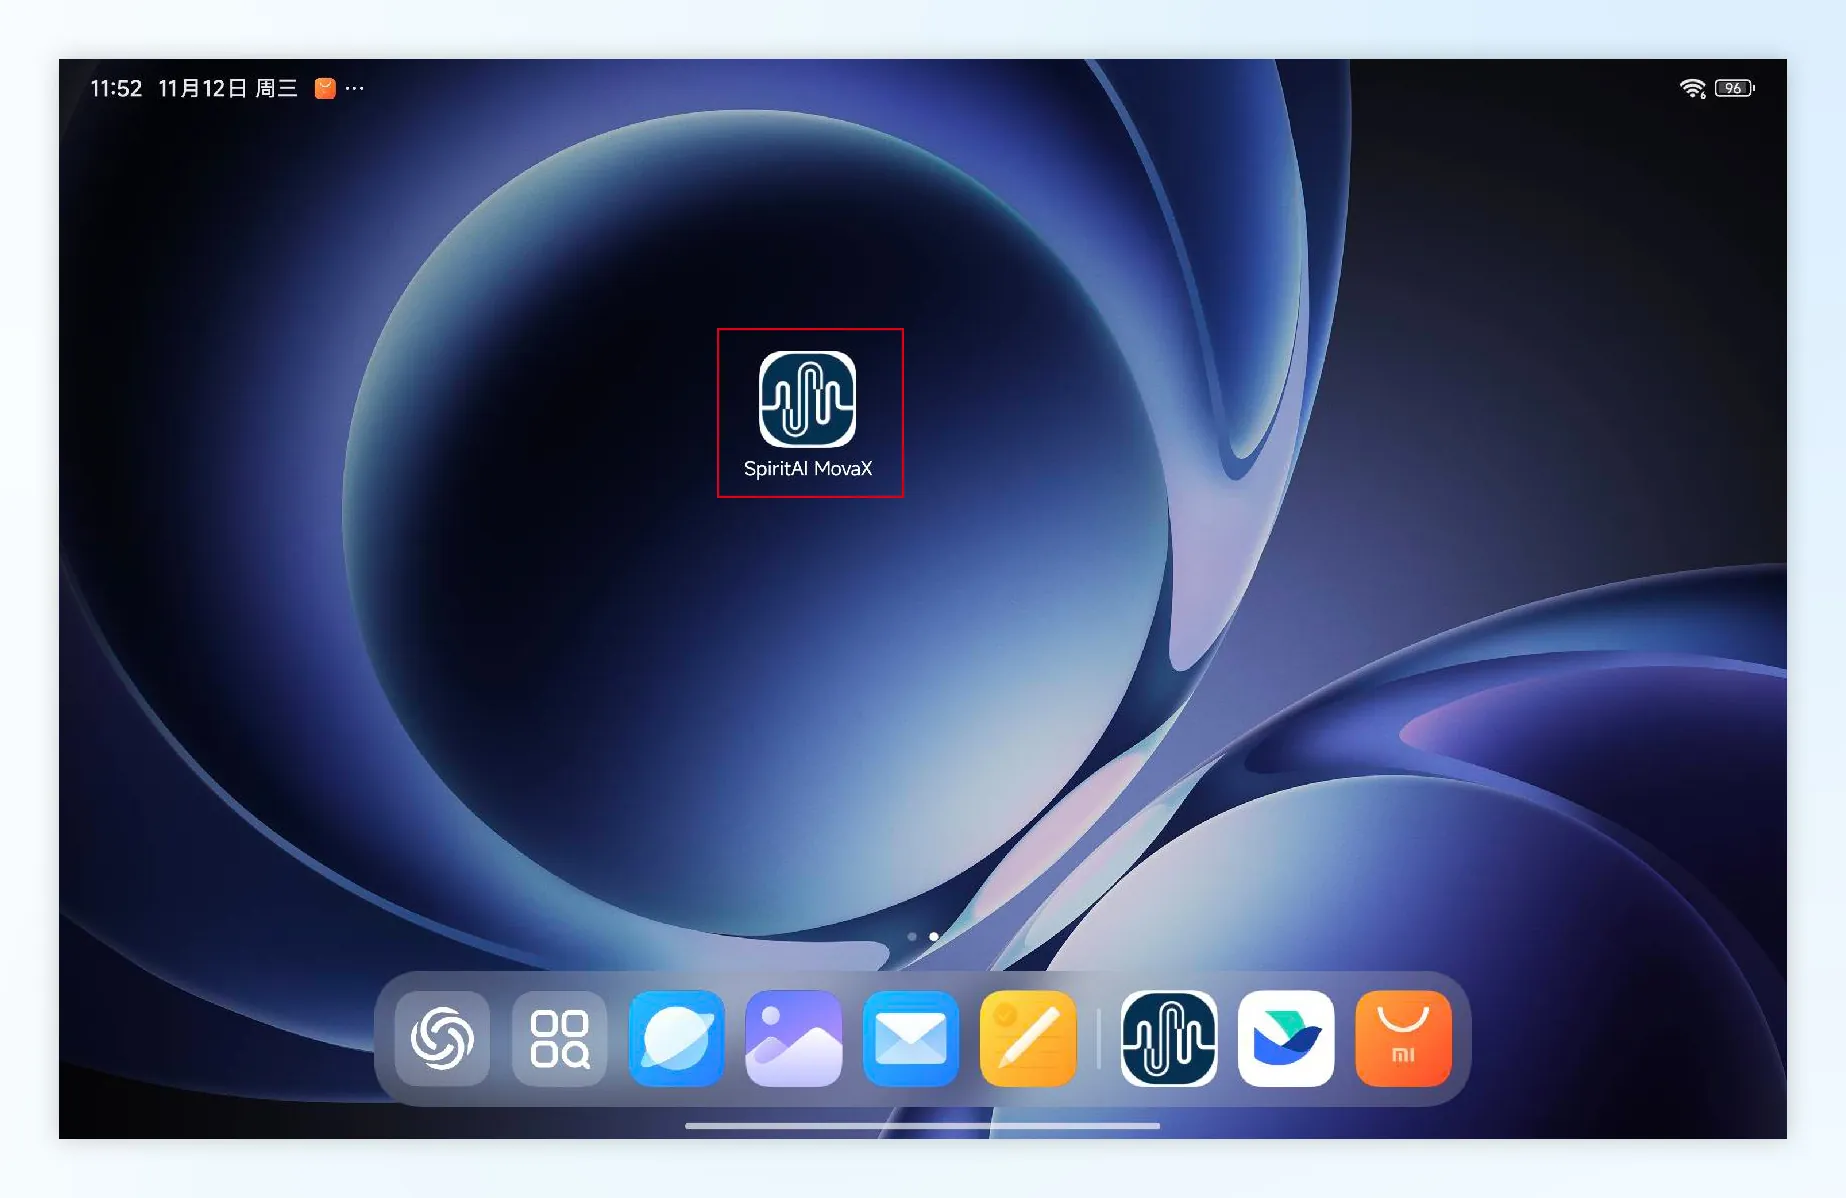
- Power on the tablet, open SpiritAI MovaX (For MovaX usage, please refer to Spirit-AI Moz 1 Robot User Manual Chapter 8 HMI Introduction)
- Pull open the controller, place the tablet in the controller, the controller will automatically power on
- Start using
Usage Methods
Default Operation Mode
- The controller defaults to User Control Mode, allowing direct robot motion operation.
- During operation, the tablet will synchronize and display robot status changes in real-time.
- In External Control Mode (VR/Remote), the controller is not effective
- After opening MovaX, clicking "Controller Teaching" will display controller shortcuts
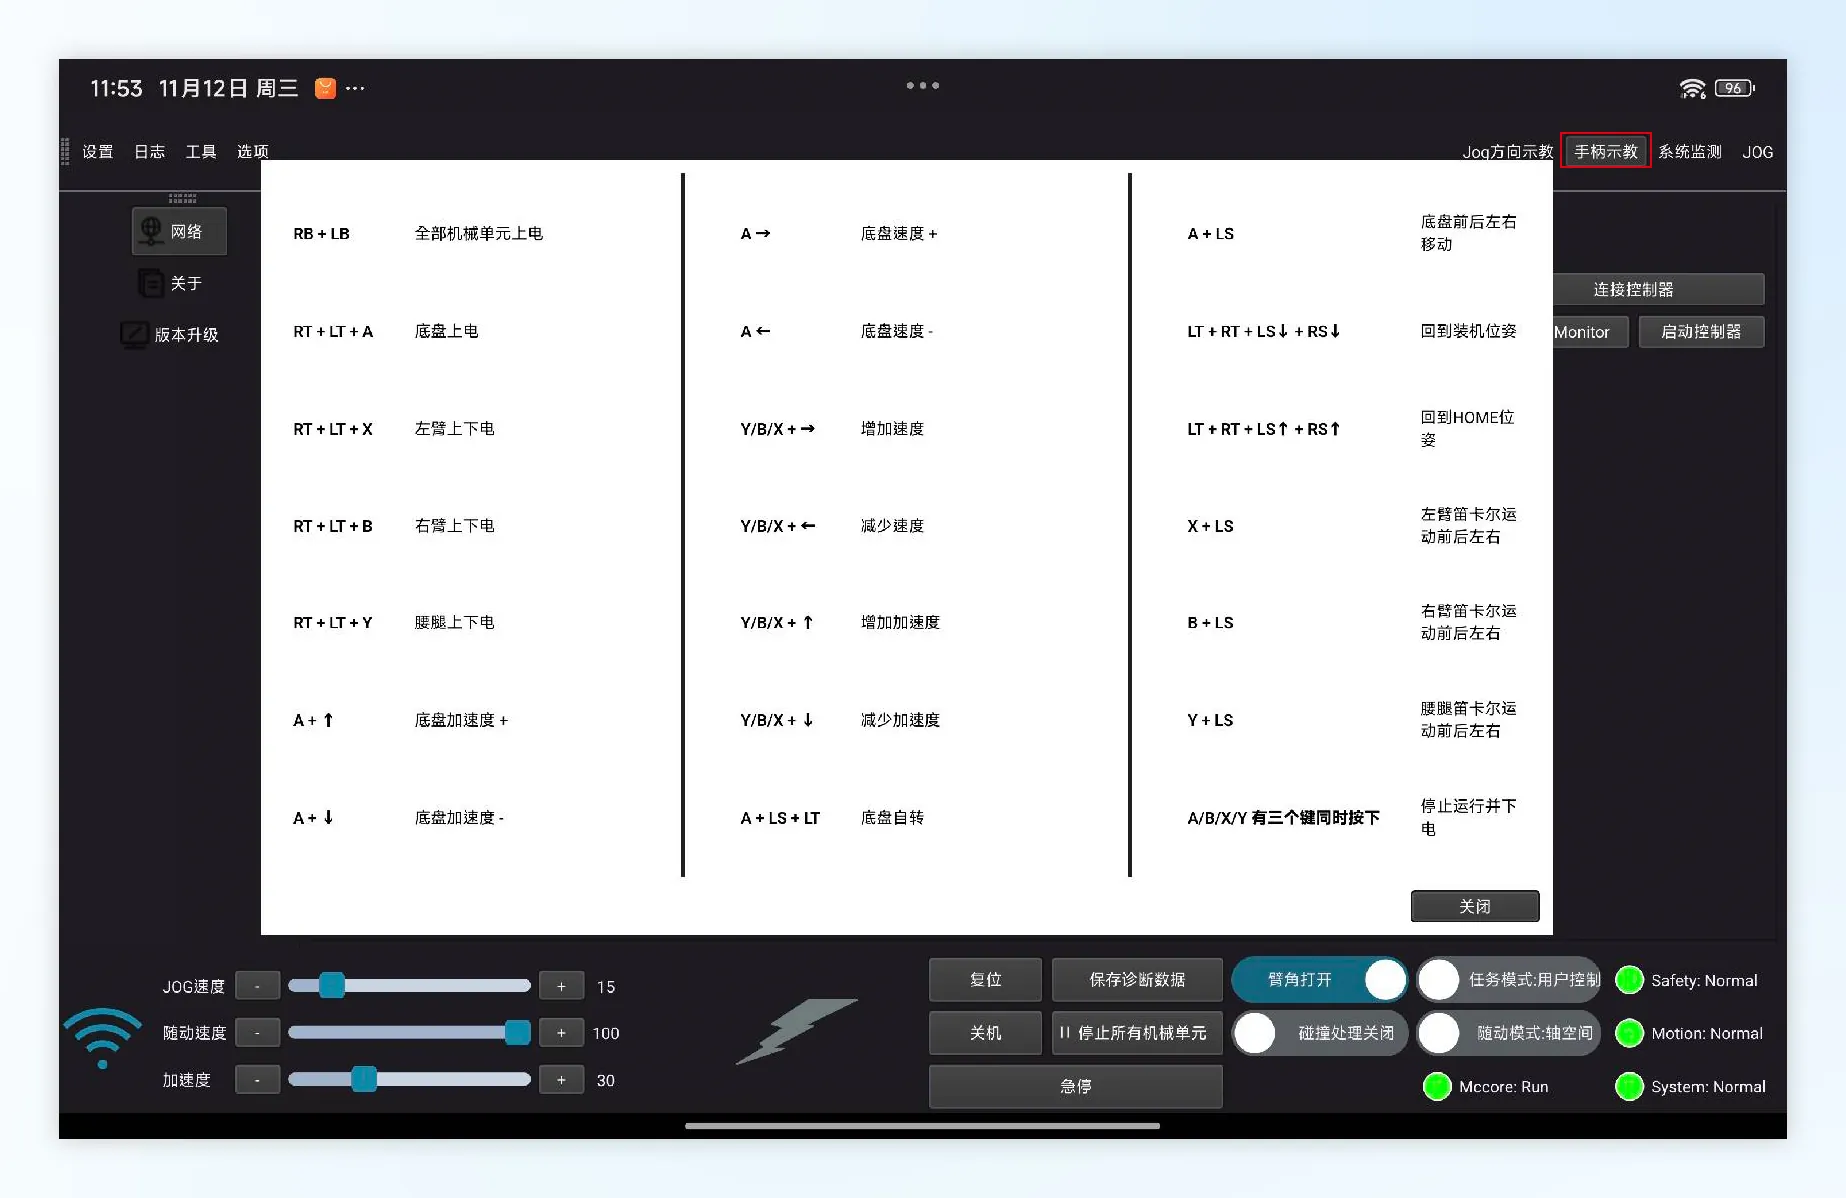
6.2 Common Function Operations (Controller Control)
| Operation | Description |
|---|---|
| ↑↓ | Acceleration adjustment, can be used in conjunction with A/B/X/Y keys |
| ←→ | Speed adjustment, can be used in conjunction with A/B/X/Y keys |
| A + ↑ | Chassis acceleration increase |
| A + ↓ | Chassis acceleration decrease |
| A + → | Chassis speed increase |
| A + ← | Chassis speed decrease |
| Y/B/X + → | Chassis/Left Arm/Right Arm speed increase |
| Y/B/X + ← | Chassis/Left Arm/Right Arm speed decrease |
| Y/B/X + ↑ | Chassis/Left Arm/Right Arm acceleration increase |
| Y/B/X + ↓ | Chassis/Left Arm/Right Arm acceleration decrease |
| A + LS + LT | Chassis rotation (clockwise/counterclockwise) |
| A + LS | Chassis forward/backward/left/right movement (precise control) |
| X + LS | Left arm Cartesian motion (forward/backward/left/right) |
| B + LS | Right arm Cartesian motion (forward/backward/left/right) |
| Y + LS | Leg-waist Cartesian motion (forward/backward/left/right) |
| LT + RT + LS↓ + RS↓ | Return to packing posture (default position) |
| LT + RT + LS↑ + RS↑ | One-key return to HOME position (customizable) |
6.3 Multi-function Combination Keys (Power On/Off Control)
| Combination Keys | Function Description |
|---|---|
| RB + LB | All mechanical units power on (chassis, left arm, right arm, leg-waist) |
| RT + LT + A | Chassis power on/off (simultaneously activates speed mode) |
| RT + LT + X | Left arm power on/off |
| RT + LT + B | Right arm power on/off |
| RT + LT + Y | Leg-waist power on/off |
| Any three of the four A/B/X/Y keys pressed simultaneously (A+B+X or A+B+Y or B+X+Y or A+X+Y) | Stop operation and power off (safe exit) |
⚠️ Note: All "Power On/Off" operations must be performed when the robot is stationary, unloaded, and no personnel are in contact, to prevent accidental startup.
How to Charge
- Use the included USB-C charging cable (original cable recommended) to connect the controller to a power source.
- Insert the charging cable into the USB-C port, connect to a computer, power adapter, or mobile power bank that supports USB-C charging.
- It is recommended to check the battery level before each use. Charge promptly when the battery is below 20% to avoid sudden power loss.
- Charging time is approximately 1.5 hours (may vary slightly depending on the usage environment).
- Using non-original chargers or third-party power sources is prohibited to avoid damaging internal circuits.
- Additional notes on controller charging:
- When the controller is extended, only the right battery is charged.
- When the controller is closed, both left and right batteries are charged.
- When the controller is in charging state, closing left and right will not automatically shut down.
- In charging mode, the Mode light breathes to indicate current battery level.
Troubleshooting
| Symptom | Possible Cause | Solution |
|---|---|---|
| Controller not responding | 1. Battery depleted 2. Controller entered standby mode after long period of non-use | 1. Check charging cable connection, try charging; if still ineffective, contact after-sales 2. Press the controller home button to exit standby mode |
| Button failure | 1. Button covered by dirt 2. Software lag 3. Controller has rapid-fire function set | 1. Clean buttons with dry soft cloth; restart controller or restart robot system 2. Double-click M key to clear rapid-fire settings |
| Cannot connect to tablet | 1. Bluetooth not turned on 2. Controller not paired | Check if Bluetooth is enabled, restart devices and retry |
| Speed/acceleration cannot be adjusted | 1. Accidental button press 2. Signal delay | Reconfirm button combination, check controller and tablet connection stability |
| One-key return-to-zero failed | 1. Robot not connected 2. HOME position not correctly set | Check robot connection status, check robot IP address, reconfigure HOME position in system settings |
| Tablet display black screen or not responding | 1. Tablet system frozen 2. Network interrupted | Restart tablet, check Wi-Fi connection |
| Controller and tablet connection disconnected | 1. Weak Bluetooth signal 2. Distance too far | Bring devices closer (≤3 meters), ensure no obstructions; try re-pairing |
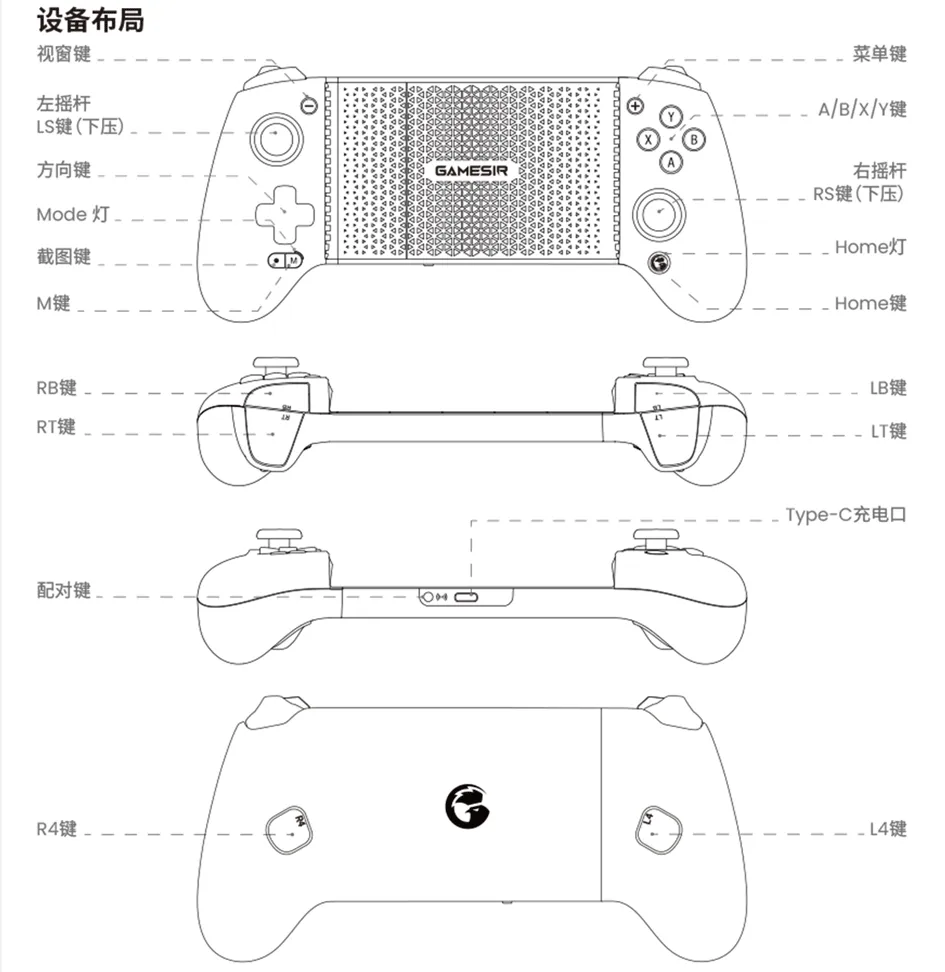
Appendix 1: Controller Button Layout: