Moz1 Autonomous Mapping and Navigation System
1. Introduction
This document describes the usage and deployment methods of the Spirit robot base navigation package. Through this document, you can implement robot movement and mapping functions, including selecting points in the visualization interface (rviz) to move the robot to positions, or using ros service to move the robot to specified positions.
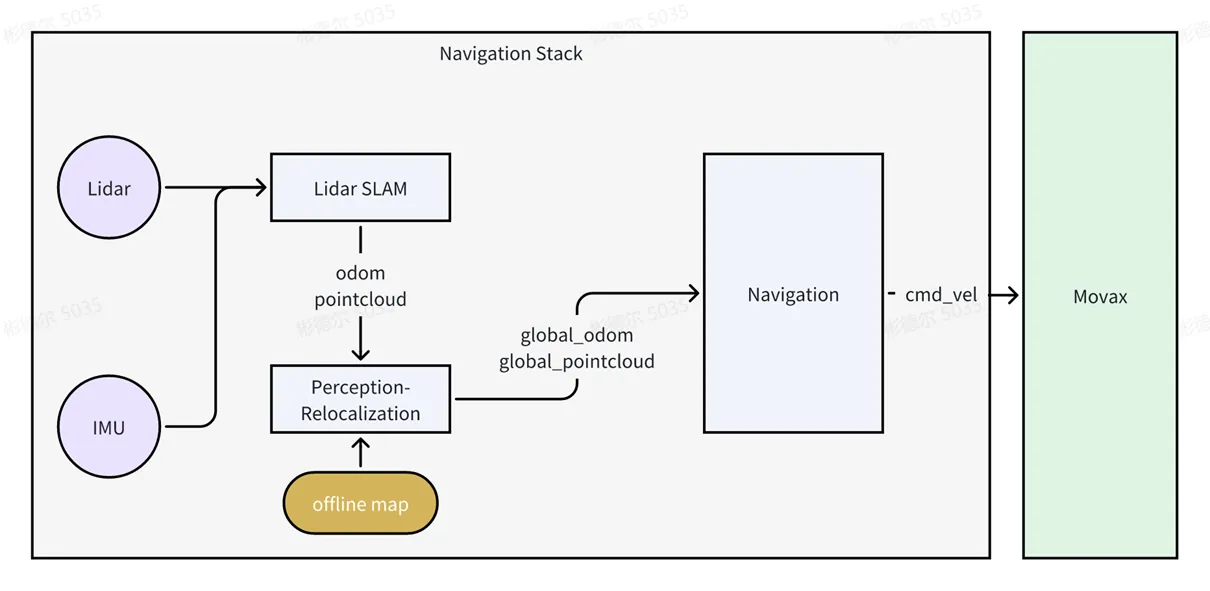
The overall architecture of the navigation package is shown in the figure below. The LiDAR MID360 is responsible for outputting LiDAR and IMU data. Lidar SLAM completes the positioning and mapping functions. The relocalization module is responsible for calculating the robot's position in the offline map, and sends the converted map and pose data to the navigation algorithm. Finally, the navigation algorithm issues control commands to the controller to implement robot base movement.
Navigation package directory structure:
├── docker_image             # Directory for docker images
│   └── nav.tar                  # docker image
├── run_mapping.sh          # Start mapping script
├── run_nav.sh                 # Start navigation script
├── run_save_map.sh        # Save point cloud map script
├── stop_all.sh                  # Stop navigation or mapping script
├── test_pkg/                   # Test package directory
  ├── record_pose.sh       # Navigation point recording script
  ├── run_circle.sh           # Circular navigation test script
  └── single_pose.py        # Single point tracking file
└── workspace                  # ros workspace
2. Preparation
Before using this feature, please ensure you have read the user manual and mastered the basic operation of the Moz1 robot;
- Enable the robot base power through the controller interface, and ensure the robot can achieve basic movement through the controller;
- Using the navigation package involves X11 forwarding for visualization. We recommend using MobaXterm;
3. Environment Preparation
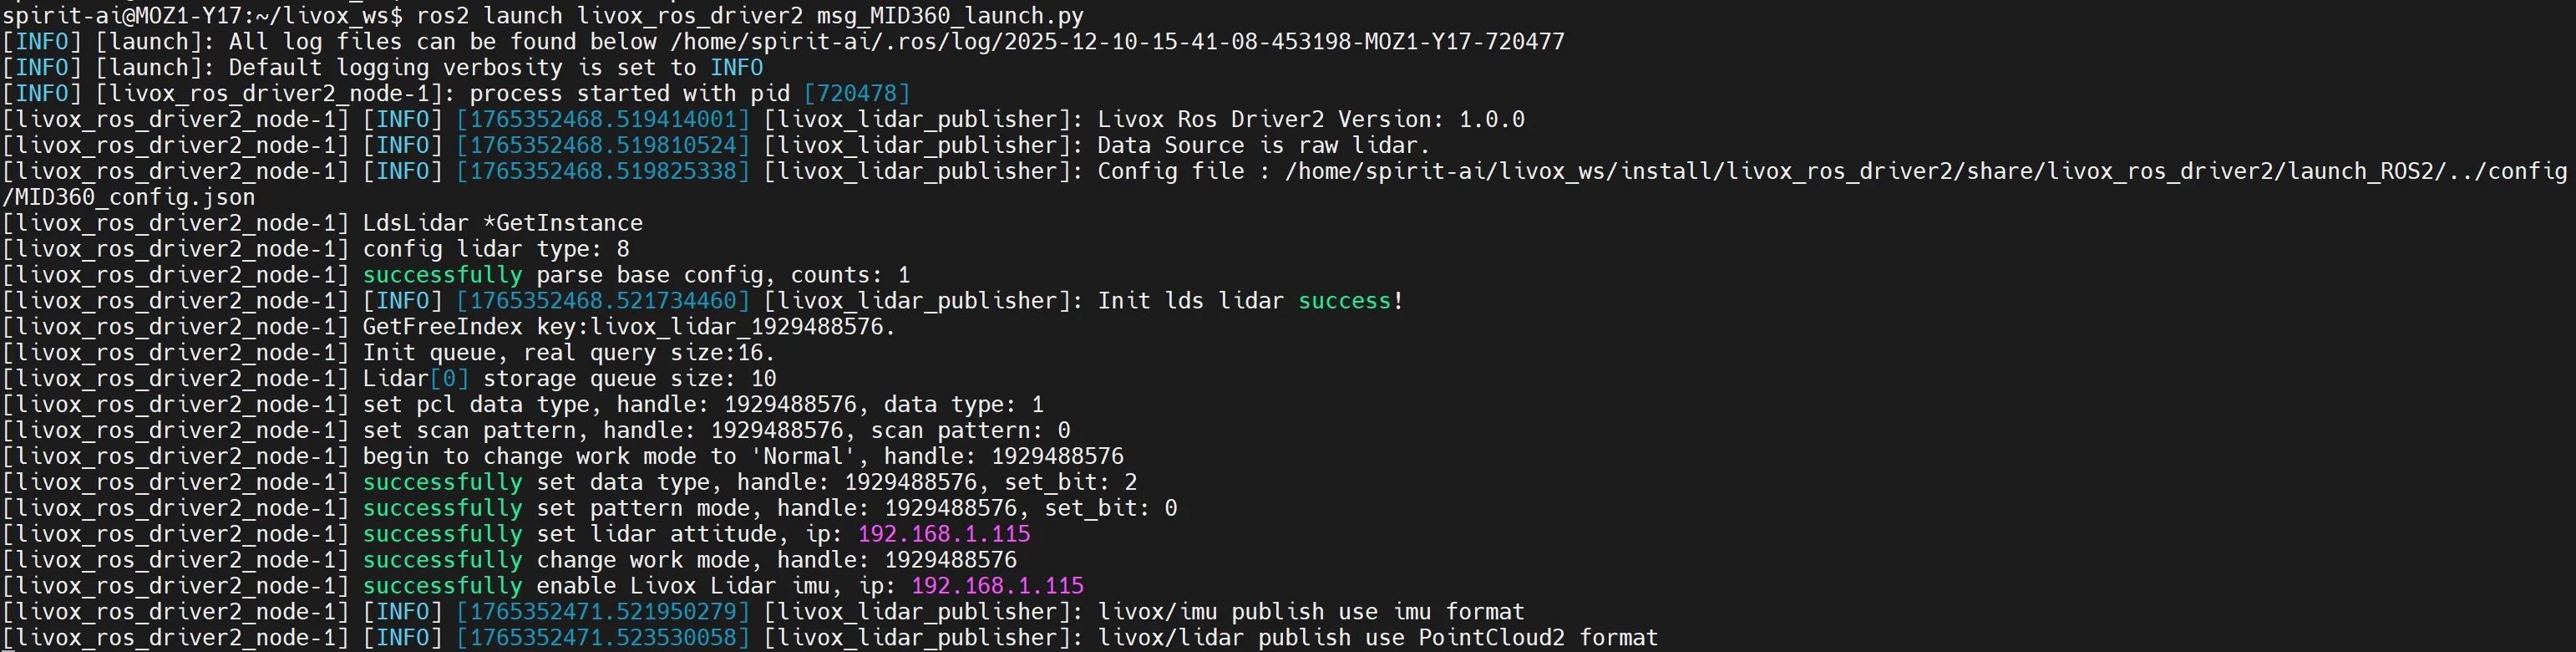
- Each robot comes pre-configured with the LiDAR (MID360) SDK and ROS2 driver. Please first ensure the LiDAR driver is working properly. Execute the following command to start the LiDAR:
cd /home/spirit-ai/livox_ws
source install/setup.bash
ros2 launch livox_ros_driver2 msg_MID360_launch.py
After successful startup, you should see the following information in the terminal indicating successful startup:
- Extract the navigation package
nav_stack.tarto thehome/spirit-aidirectory, then enter the directory:
tar -xvf nav_stack.tar
cd nav_stack- The navigation package runs in a
dockerenvironment, which has been saved as an offline package in thedocker_imagesdirectory undernav_stack:
cd docker_images
docker load -i nav.tar- After the environment is ready, you can start using the basic navigation features. In the
nav_stackdirectory, there are four scripts:run_mapping.sh: Start mapping script, execute LiDAR SLAM to obtain the offline map of the environment;run_save_map.sh: After starting the mapping script, execute this script to save the offline map for navigation;run_nav.sh: Start navigation function. The prerequisite for starting this script is that mapping is complete;stop_all.sh: Used to stop mapping or navigation functions;
4. Getting Started:
- Start mapping: Before mapping, ensure the LiDAR (Livox-MID360) has been started, then open a terminal and execute in the
nav_stackdirectory:
./run_mapping.shAfter the script starts, an rviz visualization window will pop up, displaying as follows:
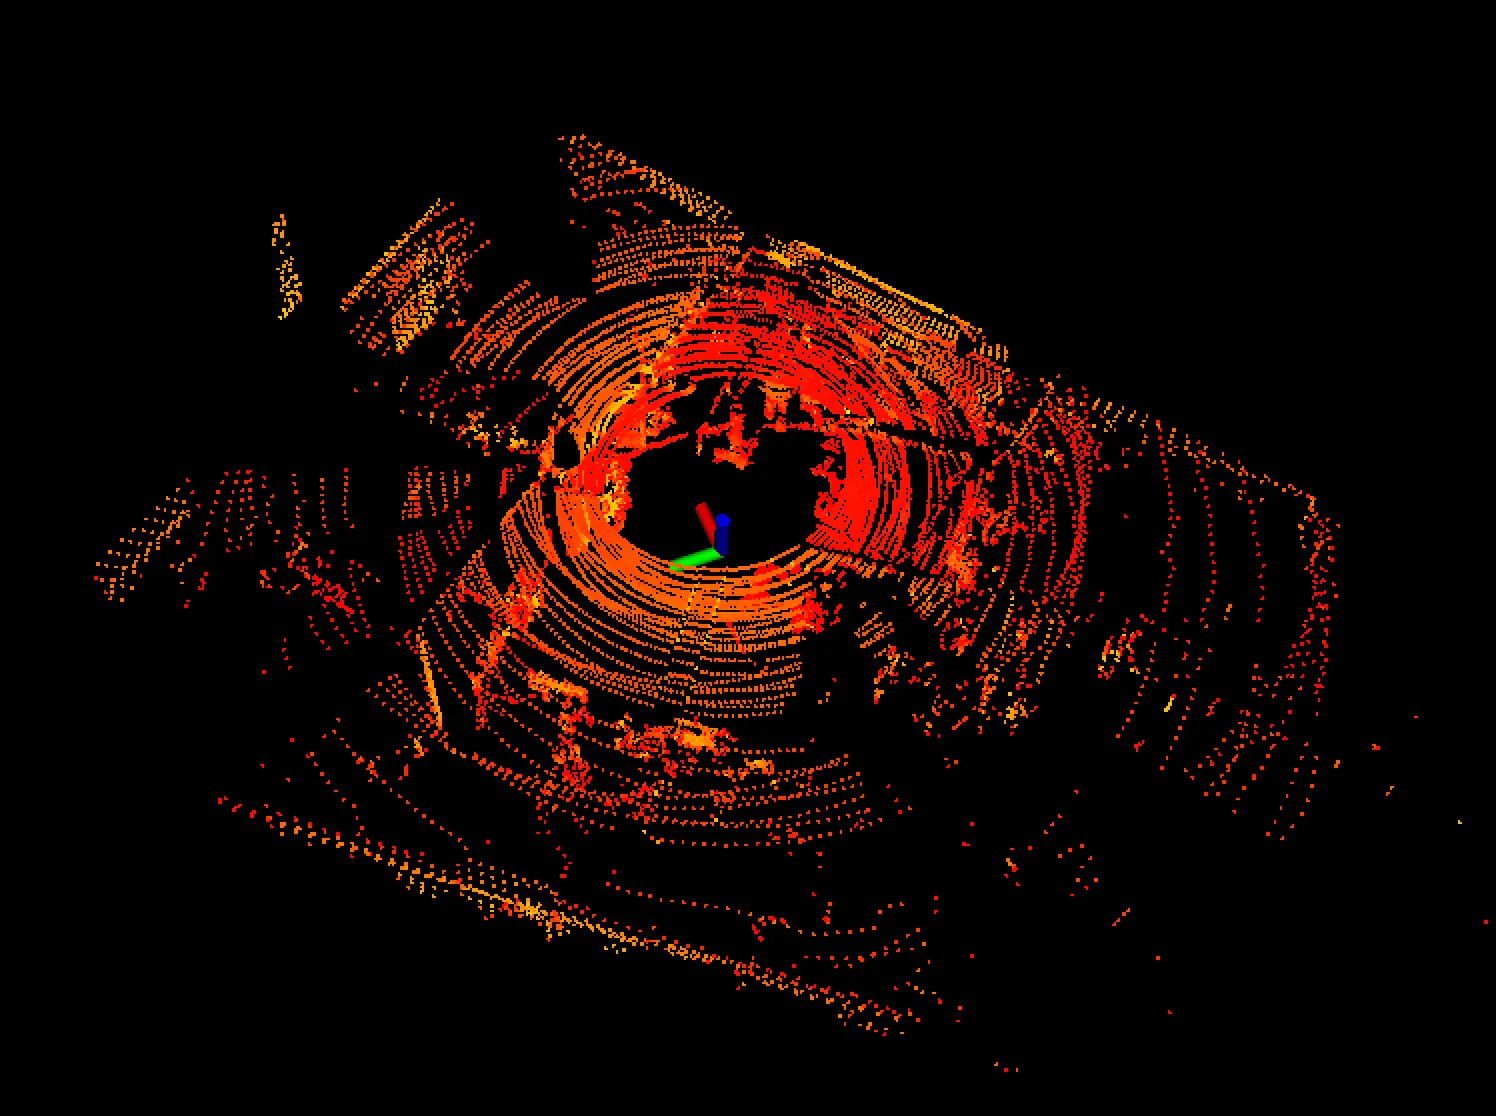
After confirming the mapping function is working properly, use the controller to remotely control the robot to move around the area that needs navigation to complete the mapping (if using the controller to move the robot, the base needs to be powered on, but the following mode should not be enabled). During mapping, try to avoid pedestrians walking in the environment, which may cause scattered points in the map. Scattered points in the map may be recognized as obstacles in the navigation map, causing ghost images.
TIPS: If scattered points in the map cannot be avoided, you can use meshlab (for processing ply point cloud files) or cloudcompare (for processing pcd point cloud files) to trim the point cloud. The relocalization algorithm in the navigation package supports processing of ply and pcd files. Users with navigation experience can modify the map refresh method by changing the navigation parameters in navigation2.
- Save map: After confirming the content to be mapped from the
rvizvisualization, open a new terminal and execute the script to save the map:
./run_save_map.shIf the map is saved successfully, you will see the following prompt:

- Stop mapping function: After completing the mapping task and saving the map, open a new terminal and execute the following script to stop the mapping function:
./stop_all.sh- Start navigation: At this point, you have completed the map needed for navigation. Now you can start navigation. Open a new terminal and execute the following script to start the navigation function:
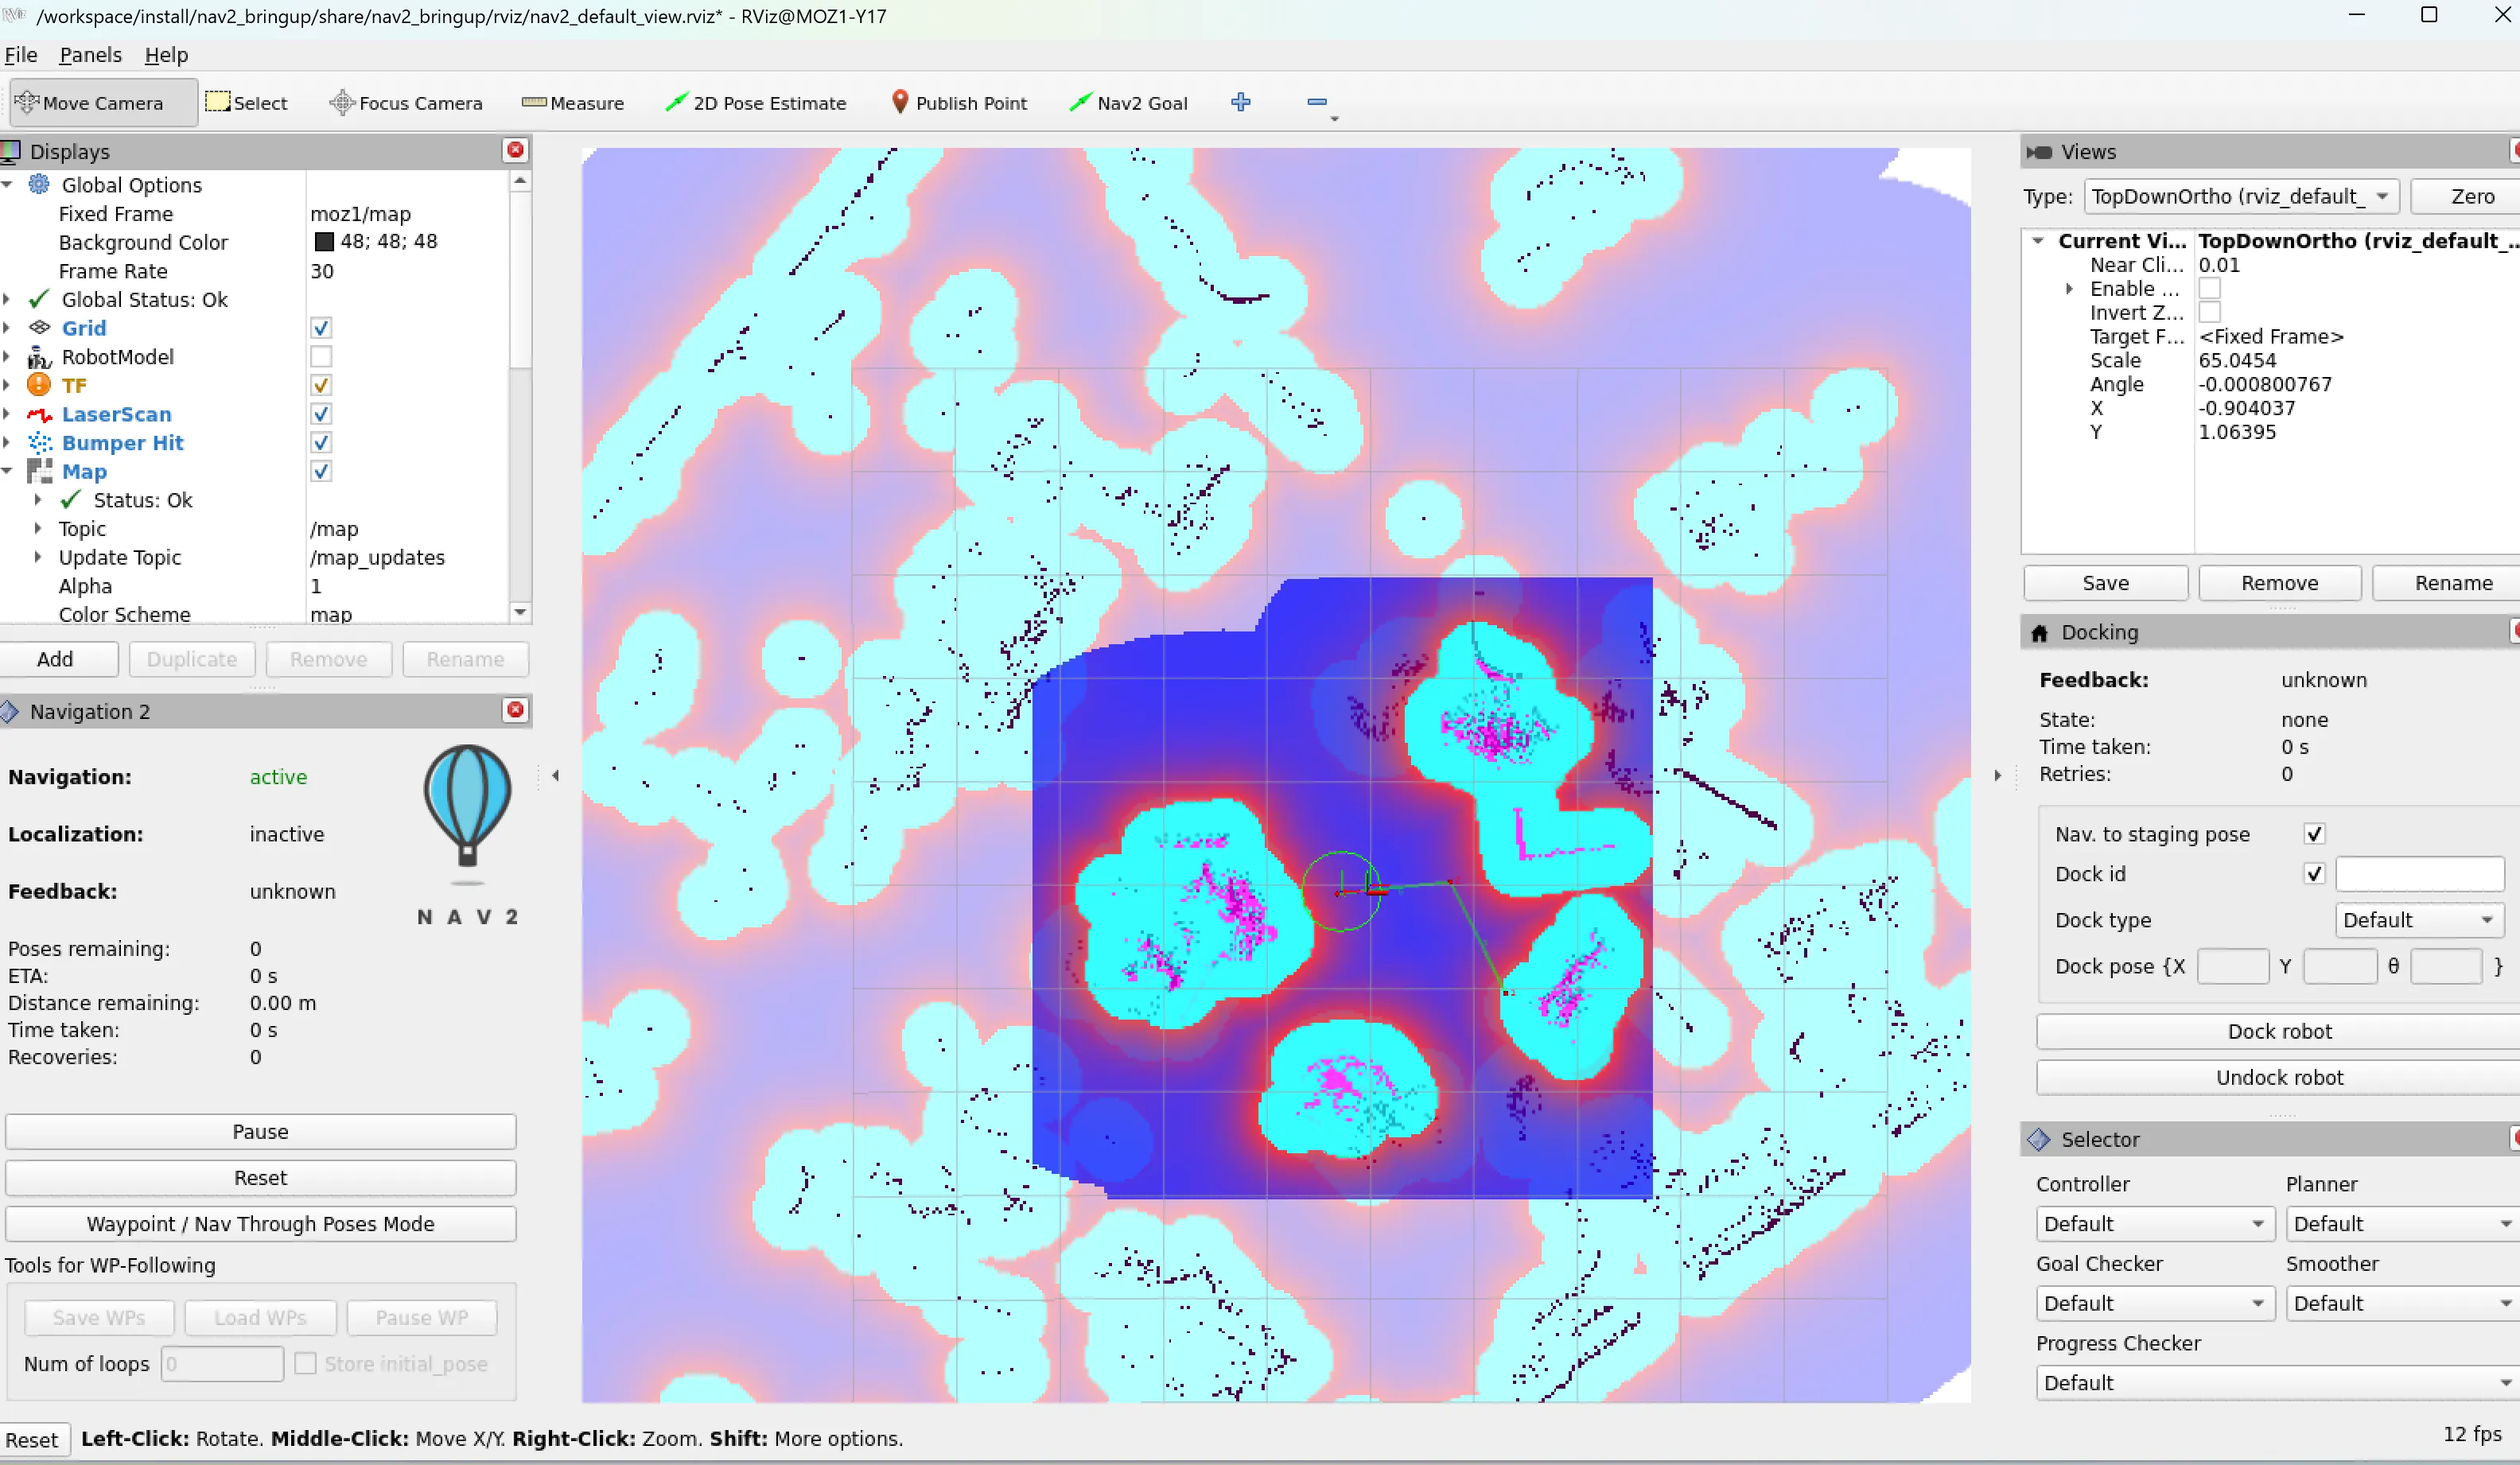
./run_nav.shAfter waiting for the entire navigation function to initialize, the navigation function will pop up a visualization interface. You will see the following window:
Configure the controller: Now please turn on the following switch in the controller. After enabling following, the robot base will execute the control commands issued by the navigation algorithm. If not enabled, the robot will not execute the navigation algorithm commands. Also, please modify the controller's parameter settings. The current navigation algorithm is tuned at 100% speed and acceleration. By default, speed and acceleration are 10%. For safety, you can set it to 50% for the first use, and then gradually increase speed and acceleration after confirming everything is correct.
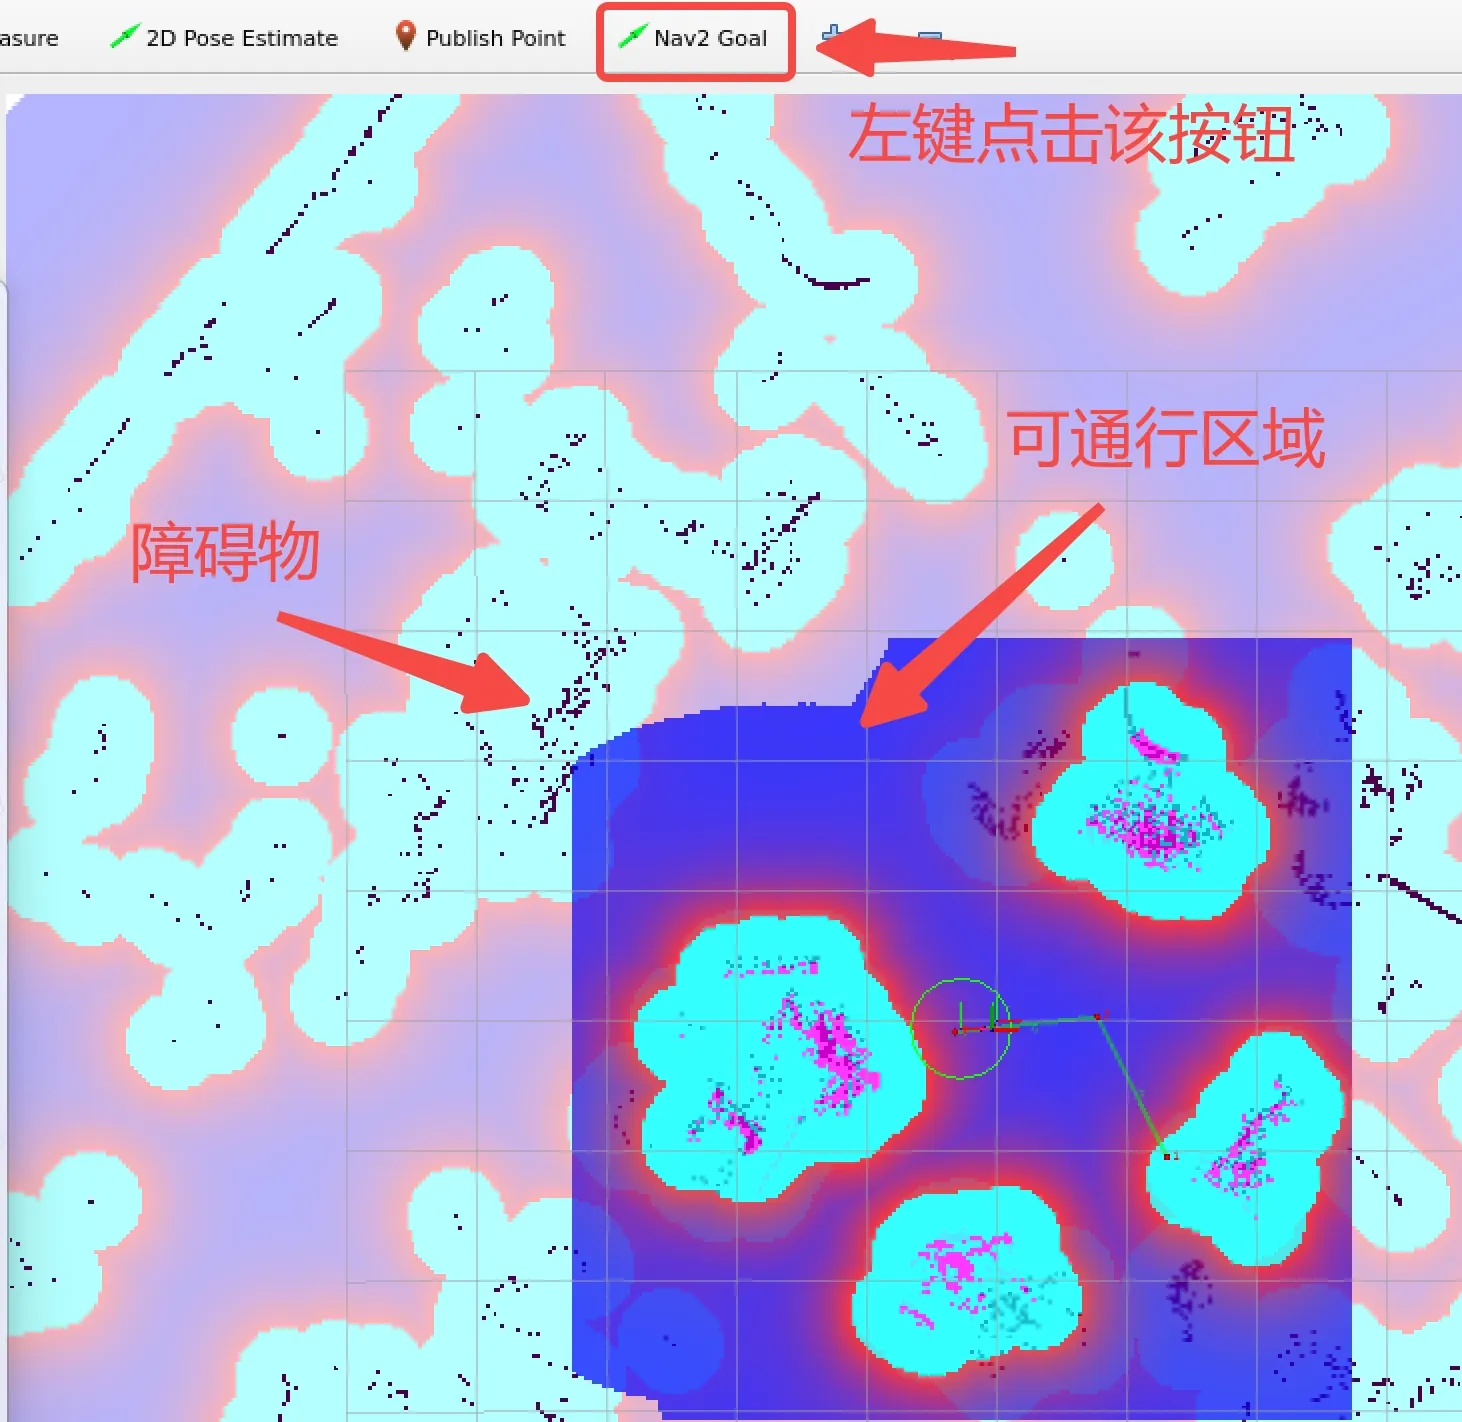
Complete navigation through the rviz interface: Left-click the Nav2 Goal button, then in a passable area on the map, left-click a point and hold, move the mouse to give the robot's target orientation
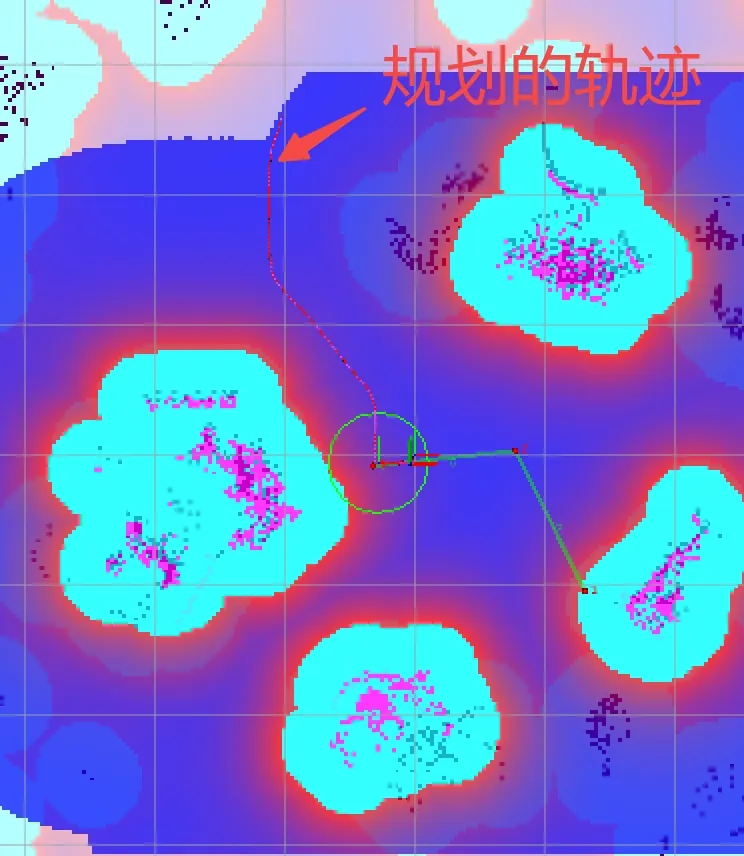
After giving the target point, a trajectory will be planned on the map, as shown below. After successful planning, the robot should autonomously move to that target point:
At this point, you should be able to complete the robot's navigation function through the visualization interface. Try giving a few more target points.
5. Advanced Tutorial (For Secondary Development Users)
- Move the robot to a specified position through ros service:
- The current navigation package uses cyclone_dds as the ros middleware. If using service calls to the navigation interface, please switch the middleware to cyclone_dds. You can switch through the following steps:
apt update apt install ros-humble-rmw-cyclonedds-cpp export RMW_IMPLEMENTATION=rmw_cyclonedds_cpp # Temporary switch echo 'export RMW_IMPLEMENTATION=rmw_cyclonedds_cpp' >> ~/.bashrc source ~/.bashrc # Permanent switch- Since this ros service contains custom types, please copy the following package to your workspace and compile it. For interface calls, refer to the example code scripts/example.py in the package: navigation_interfaces.tar
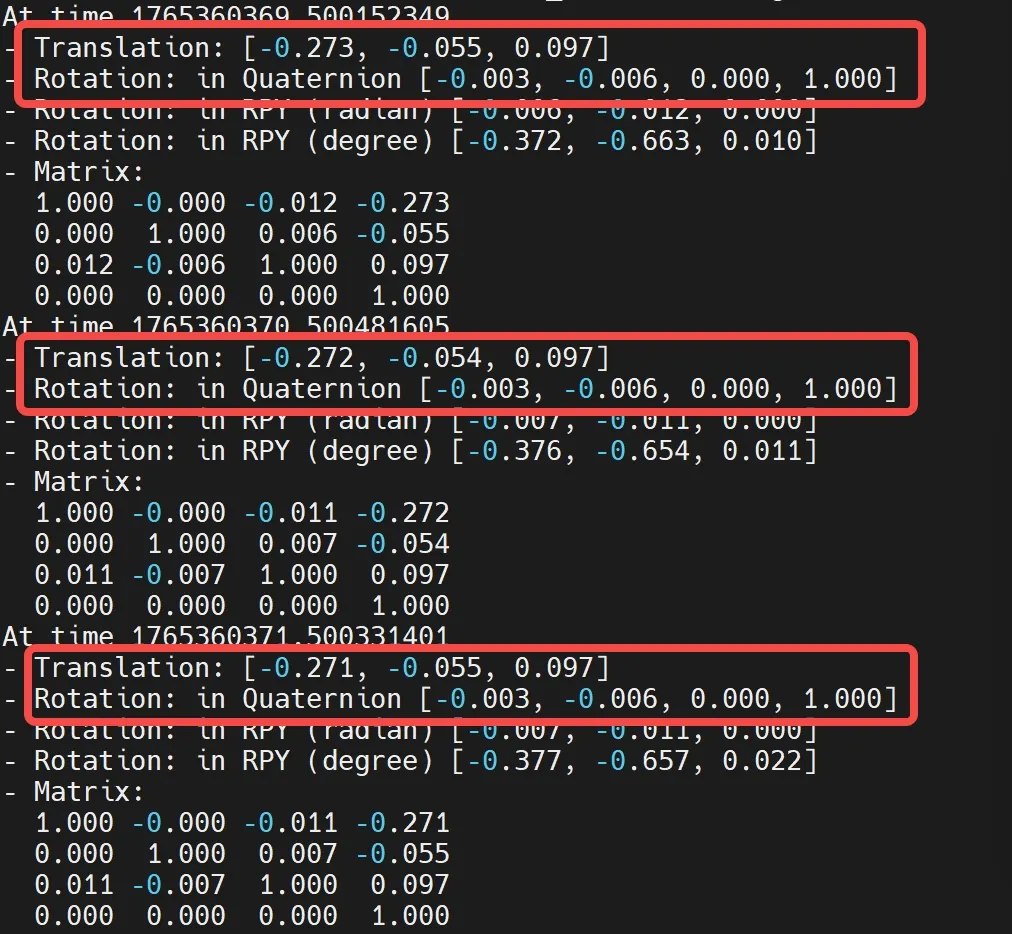
- This ros service can receive a sequence of robot poses. When the pose sequence has one element, the robot will navigate directly to this position. When the pose sequence has more than one element, the planned path will use the intermediate points as constraint points, and then navigate to the last point. Note that the positions here are the robot's global poses in the map (six-DOF pose after relocalization is complete), and the coordinate transformation is the rotation and translation from the robot base center to the offline map world coordinate system. Open a new terminal and you can view the TF tree through the following command:
ros2 run tf2_ros tf2_echo moz1/map moz1/base_link
If the navigation function is working properly, you can see the current pose status. Record this pose as a waypoint. Translation is the translation (x,y,z) from the robot base moz1/base_link frame to the offline map moz1/map frame, in meters. Quaternion is the rotation quaternion (x,y,z,w)
- If users need to adapt their own navigation algorithm framework, please pay attention to the
control_bridgepackage in theworkspacedirectory. It converts the/cmd_velmessages fromnavigation2and corrects the coordinate system to adapt to the base's coordinate system and topics.